Pages

Tuesday 11 June 2013

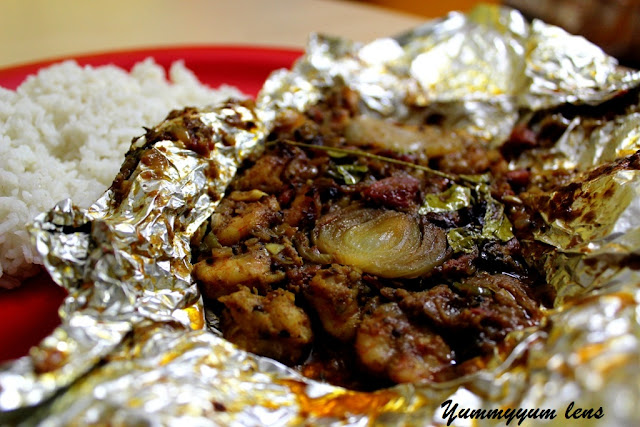
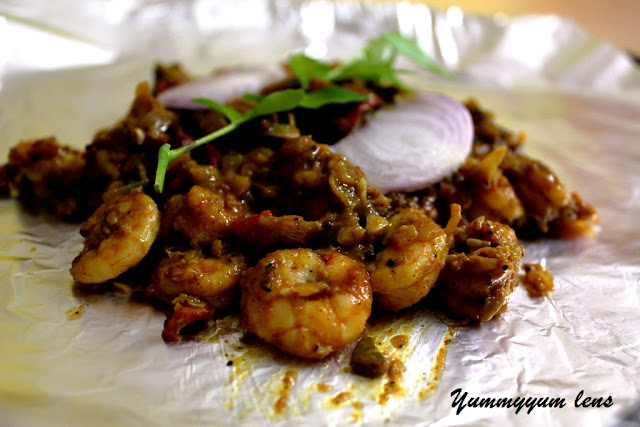
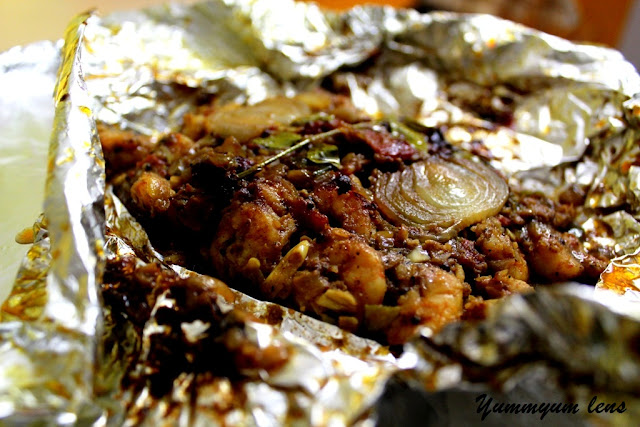
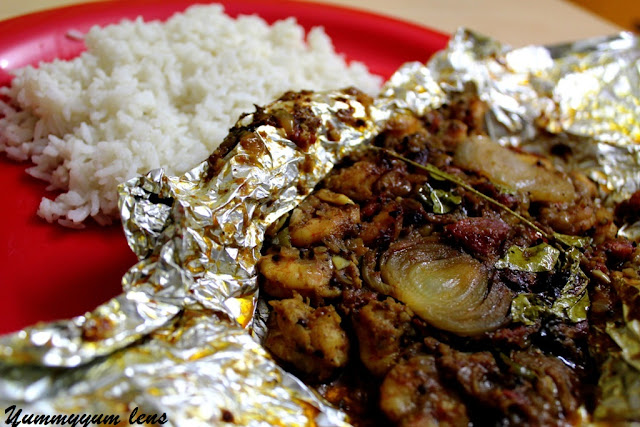
Chemmen Pollichathu (Kerala Style Foil Baked Prawns Masala)


Now, that was an easy 2 months gap from blogging and a lot happened in this time. We went on a short vacation en-route our yearly visit to home (both parents are still unhappy since they did not get enough of us this time), two of my very good friends got transferred out, I picked up my long lost talent and hobby of sketching/painting and a lot more. Now that I am back to routine, I am back with a bang. 

Chemmen Pollichathu


The weekend that went by was quite eventful; some of the errands that we kept postponing for one reason or the other were finally attended to, followed by a quick shopping spree and climax at inox watching the epic finale of "Hangover"! Now I believe in the theory anything that starts off well ends well too :-) So what lead to this eventful weekend? Well, of course, good food.

With fresh prawns sitting in the refrigerater, I somehow had to free myself from the clutches of "laziness" (which had in fact entangled me for over 2 months) and try out something nice. I have always wanted to try prawns pollichathu, the typical Kerala way and finally, I got hold of a recipe, which I found as both easy and tasty.

In my version of Chemmen Pollichathy (Kerala Style Foil Baked Prawns Masala)  recipe, I have doubled the ingredients and have also used aluminum foil for baking (instead of banana leaf).

I am sharing a few up-close images here.

Prawns masala before being wrapped in aluminum foil

Prawns masala


 Wrapped in aluminum foil, ready to be baked

Prawns covered in aluminum foil

Hot out of the oven

Foil Baked Prawns

Teamed with piping hot steamed rice

Foil Baked Prawns Masaka

Saturday 6 April 2013

Creamy Palak Paneer (Cottage Cheese in Creamy Spinach Gravy)

The part of the country where I come from palak or spinach is not common. So it wouldn't be hard to believe when I say, this is my first attempt at this very popular North Indian delicacy; not that I haven't had the dish before, just that I haven't cooked it till now despite of it being one of my favorite dishes!


Palak Paneer with Methi Roti


My refrigerator is often loaded with different cheese varieties, because I admire cheeses and love to experiment quite a lot. I enjoy very few vegetables and thankfully spinach is among them. So since I had both the main ingredients for this dish, I thought of making it today.

Usually my maid makes decent palak paneer, however, I wanted mine to taste a little different and hence I browsed and bumped into this recipe; coming from the master chef himself, it did not give me any reason to not try this one. So, the recipe below is adapted from here but with a simple twist of my own.

Creamy Palak Paneer


Time spent was mere 10-15 minutes and the outcome was totally exhilarating! 


Ingredients:

Spinach - 1 loose bunch, stems removed, blanched in salted boiling water, refreshed in chilled water, drained
Paneer - 250 grams, cut in cubes and slightly pan roasted in a teaspoon of butter
Green chilies - 3, chopped
Garlic - 6 cloves, crushed
Cumin seeds - 1 teaspoon
Lemon juice - 1/2 tablespoon
Fresh cream - 2 tablespoon
Oil - 2 tablespoon
Salt to taste 

Preparation:

1. In a mixer, puree together the spinach and green chilies. Keep aside.
2. Heat oil in a pan and splutter cumin seeds. To this add crushed garlic and saute for a couple of minutes, taking enough care not to burn it.
3. Add the spinach puree and salt to taste. Add water, if needed and bring it to boil. Add the roasted paneer pieces, followed by lemon juice and let it simmer for another 3-5 minutes.
4. When done, stir in the fresh cream, mix well, heat through and remove from heat. 
5. Serve with roti, naan or plain steamed rice.


Spicy Minced Meat

Ever thought of making something that can be used in a number of ways? Something that can be used for making patty, filling for roti, savory pies, tarts, wraps or added to pasta or rice, sauces, frittatas, casseroles and more! Well, this minced meat recipe is just right to go with anything you have in mind.


Spicy Minced Meat


Since I work and operate from home, I do most of my cooking in the evening and hence I am always in the look out for make ahead dishes; 3/4 of which can be made the previous day and all I am left with is mere assembling in the morning! And this recipe is also the outcome of one such experimentation. Although I had intentions to use it for today's breakfast, I ended up finishing it yesterday itself; used it for layering puttu and had it for lunch and dinner!

Very easy to prepare, this is one such dish that gives you the liberty to play with flavors. This recipe is perfected to satiate my taste-buds and I am sure others will have their own.


Ingredients:

Olive oil - 2 tablespoon
Onion - 1/2 medium, chopped finely
Garlic - 6 cloves, crushed
Mutton mince - 250 gram, cleaned and drained
Italian herb mix - 1 tablespoon
Dried paprika flakes - 1 teaspoon
Freshly ground pepper - 1 teaspoon
Tomatoes - 2 small, cut into cubes
Lemon juice - 1-2 tablespoon
Chicken stock - 100 ml
Coriander leaves - 1/2 cup, chopped finely
Salt - only if needed, I did not use because chicken stock compensates for it

Preparation:

1. Heat oil in a pan in medium heat and add onion and garlic and stir fry for a couple of minutes.
2. Turn heat to medium-high and add the minced meat. Using a wooden spatula, continuously stirring to break up the mince. Cook until the mix turns brown.
3. Add the herbs and spices, followed by tomatoes. Let it cook for a while until tomatoes become partially mushy.
4. Pour the lemon juice over, followed by the chicken stock. Let the stock boil and then reduce heat and let it simmer until the stock is used up and meat is thoroughly cooked.
5. Check and adjust salt and seasoning. Add the chopped coriander, mix well and remove from heat.
6. Use this spicy minced meat for preparing patty or wraps or whatever you think it can be used in.


Friday 5 April 2013

Drumstick Leaves in Yellow Dal Curry (Muringakai Ela Parippu Curry)

Back in Kerala, at least in my sweet village, we have and love the concept of individual houses with beautiful front garden loaded with flowering plants of all kinds and an even interesting never-ending backyard brimming with home-grown produces! For this reason, an average village home daily diet often contains a lot of fresh vegetables, most of which are the leafy variety and our very own coconut, in its various forms. Drumstick tree is one of the common varieties spotted in all houses mainly because it doesn't require much of a care. Apart from the fruit of the tree, the leaves are also used widely in Kerala cooking, as it is said to have many medicinal properties.


Drumstick Leaves

Well, now this has made me nostalgic and if allowed some time before we get into the recipe details, here is a quick tour of my home sweet home in Palakkad. After years of city life in Kochi, my parents shifted to our native place to spend their retired life. And what best can one ask for in retirement life than what you are about to witness in the photos below! Since my husband is on a transferable job, I do not get the liberty to frequently visit or stay long in my house, but whatever little bit I have spent here has been truly inspiring moments. I often envy my sister; she lives in Kerala and can visit this paradise whenever she wants! Shared below are some of the clicks from my sister's collection. Thank you Renu for this!


Pathway that opens to our green green backyard!
The pathway that opens up to our areca nut, coconut, pepper and plantain garden!
Banana Plantation At Home
Exclusive plantain garden, a recent addition by my father
Greenery and A Lot More Of It
Would you believe, if I say, our house overlooks this scenery!
Now back to business! Vizag, especially the area where we live, too has its share of greenery, however, as I have seen the best, nothing comes close to that. So the other day, I wanted to prepare Dal Dosa and back in my village, we put loads of this drumstick leaves when making it. As this tree grows wild, I asked my maid about it and she readily said she will get it for me. I was thrilled, I made the dosa many times, however, did not manage to click a pic; had I done that I would have ended up missing the fun of eating it hot and crispy. With the leftover leaf, I went ahead and made this curry.


Drumstick Leaves Curry


Ingredients:

For the Curry:
Toor dal (yellow dal) - 1/4 cup, soaked, cooked with a pinch of turmeric and salt, and mashed
Drumstick leaves - 1 stuffed cup
Grated coconut - 1/2 cup
Onion - 1/2 small, chopped
Green chilies - 2, chopped
Cumin seeds - 1/2 teaspoon
Oil - 1 tablespoon
Salt to tate


For Tempering
Oil - 2 tablespoon
Mustard seeds - 1/4 teaspoon
Curry leaf - a few leaves
Dry red chili - 1, halved

Preparation:

1. Grind together coconut, onions and cumin seeds in a blender with very less water to make a fine paste. Keep aside.
2. Heat oil in a pan and stir fry the drumstick leaves for a couple of minutes. 
3. To this add the cooked dal; add water if needed and mix well.  
4. Stir in the ground coconut paste, mix well. Check for salt and allow it cook for another couple of minutes, but not allowing the curry to boil. Check seasoning and switch off
5. For tempering, heat oil in a pan, splutter mustard seeds, and stir in curry leaf and chilies. Pour this over the curry.
6. Serve it with rice or even with roti.


Wednesday 3 April 2013

Green Bean & Mushroom Salad With Orange Juice Dressing

These days I enjoy making salads for lunch and dinner, not only because they are light (I seriously need to keep my weight on watch) but I love the part of inventing my own salad dressing! Like an artist play with different colors to create one that he has in mind, I play with flavors, mix and match to get what satiates my taste buds.

Green Bean Mushroon Salad with Orange Juice Dressing


Green bean is my all-time favorite, especially when it comes to boiled or stir fries. This is one wonder vegetable that is so versatile to contain any seasoning that you impart. And quite recently I have started developing a taste for mushrooms, and hence I had a pack of white mushrooms handy, I made good use of it! Well, in terms of secondary ingredients used this one is not too different from the Honey Glazed Roasted Grapes & Chickpea Salad I made last week. 

Vegetable Salad with Orange Juice Dressing


Ingredients:

Green bean - 8, cleaned and cut in 2 inch pieces
White mushroom - 250 gram, cleaned, sliced lengthwise
Potatoes - 1 small, cut into cubes
Chicken salami - 3-4 pieces, cut into bite sized pieces (optional)
Oranges - 2 (1 in segments and the other juice extracted)
Garlic - 5 cloves, crushed
Pepper powder - 1 teaspoon
Lime - 1/2
Salt to taste
Honey - 1 tablespoon

Preparation:

1. In a pan, dry roast the salami. Keep aside.
2. Heat oil in the same pan, add crushed garlic and the veggies along with salt to taste. Saute for a couple of seconds.
3. Add half the orange extract and cover and cook for another couple of minutes.
4. Sprinkle pepper powder over, stir well to combine. Remove from heat.
5. Add orange segments, squeeze over the lime, drizzle honey and finally the leftover orange extract on top. Toss it nicely and serve!


Monday 1 April 2013

Simple Egg Biryani (My Humble Easter Treat)

If there is a rice dish that I can finish a bowl full in one go then that is biryani! The rice, the texture, the outburst of flavors - there is just nothing this lacks. Whenever I visit my hometown, along with parotta this is something I dare not miss. Each part of Kerala has its own version of biryani but my favorite is the one they sell in Kannur railway station (reason - it has 2 eggs in a pack) and the one we get at Biryani Hut in Kochi. 

Simple Egg Biryani


Being alone at home, these days I spend more time FB-ing and that's when I came across the actual connotation of Easter. It was an interesting read and of what I remember, it said about a pagan goddess and the connection of Ishtar (how Easter is pronounced) eggs and bunnies to fertility and sex. Just because I learned something interesting, I wanted to make the occasion special and I went ahead with an egg biryani, to celebrate it my way! In fact, this has been something I have been wanting to make for a while and since Pradeep is not a big fan of eggs, I sort of postponed it.

Until now I have been under the impression that I suck at biryani preparation. But, (you may find it on the verge of boasting) I feel I am pretty food at it! Well, this is my 2nd successful attempt and I hope many more will follow.

Not many ingredients, not much time investment, but the results is an absolute treat to your taste-buds.

Ingredients:

For Rice:
Basmati rice - 1/2 cup, cleaned, soaked for 30 min and darined
Whole spices - 1 teaspoon
Ghee (clarified butter) - 1 tablespoon
Salt to tate
Water - 1 cup

For Egg Masala:
Egg - 1 hard boiled and shell removed
Onion - 1 medium, sliced
Tomatoes - 2 small, diced
Ginger garlic paste - 1 1/2 teaspoon
Green chilies - 2, sliced
Yogurt - 2 tablespoon
Garam masala - 1 teaspoon
Coriander powder - 1 teaspoon
Turmeric powder a pinch
Coriander leaves - 1 tablespoon, chopped
Salt to taste
Olive oil - 2 tablespoon
Biryani masala - 1 teaspoon

For Assembling:
Onion - 1 small, sliced and crispy fried
Lime - 1 small
Coriander leaves - 1 tablespoon, chopped
Mint leaves - 1 teaspoon, chopped


Preparation:

For the Rice:
1. In a pressure cooker, add ghee and saute the whole spices for a few seconds. Add the rice, stir fry until translucent. Pour water followed by salt to taste, stir and cover and pressure cook until done. Let it cool and transfer to a bowl.

For the Egg Masala:
2. Heat oil in a pan. Add sliced onions and saute it until browned. Add the chilies, tomatoes, ginger-garlic paste and saute for a while. Add the turmeric powder and salt; mix well. Let it cook until the tomatoes turn mushy.
3. Add the herbs, followed by yogurt, garam masala and coriander powder and mix well.
4. Cut the boiled egg into half and place yolk-side down on the pan and cover with the masala. Let it cook for a few minutes, turn over. Switch off and keep aside.

Assembling:
5. In the same pressure cooker, add a layer of egg masala, followed by rice, half of biryani masala, half of the fried onions, half of the herbs and a generous squeeze of lime. Again top it up with another layer of egg masala, rice and finish off with the rest. Cover and in very low flame, cook for 10 minutes. Switch off and let it be so until pressure is fully released or it is time to serve.

6. To serve, transfer rice into a bowl, top it with egg halves, sprinkle a bit of pepper powder (optional) and keep a slice of lime by the side. Enjoy! :-)


Saturday 30 March 2013

Spicy Chunky Oriental Sauce

It is for no reason why Kerala is/was called land of spices; well  more than the spices used, I am talking about our love for spicy food! Kerala cuisine brags about being one of the spiciest in India and coming from this tiny coastal land, it was imperative that I developed a taste for spicy food. Traditional Kerala cooking uses a variety of homemade masalas, most of which are hot for any non-Keralite to bear; however, we literally go by "Athidi Devo Bhawa" concept and whenever cooking for guests, we deliberately bring down the spice level. We hate bland food and people like me, love the spiciness to stay even when we are done with enjoying the food! 

Spicy Oriental Sauce


Talking about this sauce - this is something I have been wanting to make for a while now, and I did make a mention of it in my Steam Shirmp & Sausage Wontons posting. So today, I finally made it and paired it with pancakes! Yes, that sounds weird but guarantees total enjoyment. 

Pancake Roll-ups with Spicy Sauce


This sauce is HOT, to be elaborate my lips were swollen after having my pancakes and the spiciness still stays (and I love that). It is chunky; use it as a spread or a dip for starters and above all, it has a hint of sweetness. I would call it an outburst of flavors!


Ingredients:

Tomatoes - 2 small, chopped
Onion - 1 small, chopped
Dried red chilies - 3 (depending upon your spice tolerance level, you can reduce this to 1 or 2)
Garlic - 5 cloves, chopped
Soy sauce - 1 teaspoon
Ketchup - 1/2 tablespoon (if you want it sweet, make it 1 tablespoon)
Coriander leaves - a few springs
Salt - to taste
Olive oil - 2 tablespoon

Preparation:

1. Heat up oil in a pan and add the onion, garlic and dried chilies. Saute for a while and add the tomatoes. Add salt and cook until it turns mushy.
2. Add the sauce sauce, stir for a while, followed by ketchup and sprinkle coriander leaves. Remove from heat and let it cool.
3. Transfer the content into a blender and process for half a minute. Leave it a bit chunky. 
4. Transfer to serving bowl and enjoy as a spread or dip.


Meen Puttu (Kerala Puttu Layered With Minced Fish Masala)

We are poles apart in many ways; wonder how we got married and spent 4+ years together! If there is anything where our choices match then that has to be food. So since Pradeep isn't around and I have had enough of my hibernation mode, I have decided to venture out and cooking seems to be the best way to get it all started. Well, how long can you eat the same sukha roti and daal your maid cooks; probably what instigated my taste-buds to brain relation. 

Kerala Puttu Layerd with Fish Masala


Puttu is a traditional Kerala breakfast item, made of rice flour, layered with grated coconut, very bland and hence can go along with any curry you pair it with. After generations of experimenting and perfecting, they came up with Irachi Puttu, which is normal puttu layered with minced meat masala. Since today I am in the mood of experimenting, I have decided to take this to next step and instead of Irachi (meat) give it a fish twist! 

Meen Puttu


This is quick and a person like me who is a puttu fanatic, can eat this for breakfast, lunch (which I am going to do today), dinner and yes, even as a snack.

Notes - You will need puttu maker for this dish.

Ingredients:

For Puttu Mix:
Rice flour - 2 cups
Salt - to taste
Sugar - 1 1/2 tablespoon
Water - enough to make the dough

For the Fish Masala:
Mackerel - 1, cooked, de-boned and flesh chipped into pieces
Coconut - 1/4 cup, grated
Tomato - 2 small, chopped
Garlic - 5-6 cloves, crushed
Ginger - 1 inch piece, crushed
Turmeric powder - 1/4 teaspoon
Pepper powder - 1 teaspoon
Garam masala - 1 teaspoon
Dried chili - 1/2 teaspoon, crushed
Corainder leaves - a few springs, chopped
Lime juice - 1 tablespoon
Salt  - to taste
Vegetable oil - 2 tablespoon

Preparation:

For Puttu Mix:
1. In large mixing bowl, mix together the flour, salt and sugar using hand. Add water at interval, every time, mixing the flour using hand to ensure it forms into a consistency when you hold a handful together, it retains the shape, but on breaking it falls apart easily. This takes practice and this trick is the only way you can attain the perfect consistency. Thanks to my dad for sharing the tip! Set aside.

For the Fish Masala:
2. In a pan, heat up oil and add the crushed ginger and garlic paste. Saute it for a while. 
3. Add the tomatoes and cook until it becomes a mushy mix. Add turmeric powder, pepper powder, chili powder and garam masala to the mix along with salt. Mix well to combine.
4. Now, add the fish mince and stir fry for a couple of minutes for the masala to coat. 
5. Check for salt. Add the coconut, coriander leaves, dash of lemon juice; mix well and remove from heat.

Assembling:
6. In the puttu maker, add a thin layer of fish masala, followed by double thick layer of rice flour, and on, until it is filled.
7. Steam for about 6-10 minutes or until done.

8. Serve with a spoon of ghee or as it is or with black chana curry. 

Thursday 21 March 2013

Honey Glazed Roasted Grapes & Chickpea Salad

It came as a late revelation but it did strike me that cooking shares same place as music, meditation, shopping etc when it comes to stress busters! It also gives you the pleasure of inventing something new and to feel proud about. Today, I had plans to cook a simple salad for lunch/dinner, but until I tasted the outcome I had no clue how a very raw idea could be tamed into a wonderful result. Well, let me cut the crap and just say - this is one of the best salad I have ever made and have ever tasted till date. So this definitely goes into "Pradeep Dish List" (those which I would make for him once he is back home).


Honey Glazed Roasted Grapes & Chickpea Salad


I do not know the exact nutrition facts of the dish or ingredients used, however I can guarantee that this is one quick, light, healthy and surprisingly tasty salad which is worth your time.

It must have taken me close to 15 minutes to get everything ready, pop it in the oven and roast.


Roasted Grapes & Chickpea Salad


Ingredients:

Chickpea - 1/4 cup, cleaned, soaked in water for at least a few hours and pressure-cooked with a pinch of turmeric and salt
Seedless grapes - 1/2 cup, cleaned
Potato - 2 small, cut in cubes with skin on
French beans - about 8-10, cut in 2 inch length
Garlic - 5-6 cloves, crushed
Pickled olives - 4-5 whole
Pepper powder - 2-3 pinch
Chili vinegar - 1 tablespoon
Honey - 1 tablespoon
English cheddar cheese - 1 teaspoon, grated
Salted butter - 1 tablespoon
Salt - to taste

Preparation:

1. In a sauce pan, heat butter and saute the crushed garlic. Add the potatoes and beans, stir fry for a couple of seconds. Add pepper powder and salt. Cover and cook for 3-5 min or until the beans turn dark green.
2. To this add a few splashes of chili vinegar, stir in the chickpeas and remove from stove.
3. Remove the content into a baking pan. Add the grapes and picked olives and pop it in the oven and roast on high for about 5-7 minutes.
4. Return the content to the pan, drizzle the honey over it (as per how sweet you want it to be), give it a nice toss and transfer to serving bowl. 
5. Garnish with cheddar cheese and there you have your healthy lunch! :-)

Wednesday 20 March 2013

Spiced Tomato Soup with Grilled Cheese Sandwich a.k.a My Sweet Rejuvenation Therapy

There are those days when you yearn for ultimate comfort; be it in the form of a relaxed massage, one tight hug or when there is no scope of none of the above happening - a simple comfort food! For various reasons, today was such a day for me and I went ahead and made this super simple and ultimate comfort food that is Soup with Sandwich!

Why tomato soup? Well, that's what I felt like having today and pepper-tomato combo is just amazing that it works like a rejuvenation therapy for me.


Spiced Tomato Soup

Going by the definition of comfort food, it is needless to say that this combo is quick to make, filling enough and above all, works wonders in fixing your mood! (or at least, it did for me)


Ingredients:

For Spiced Tomato Soup:

Tomato - 3 small, pureed
Vegetable stock - 60 ml
Full cream milk - 10-15 ml
Garlic - 6-7 cloves, crushed
Salted butter - 2 teaspoon
Pepper powder - 1 teaspoon
Coriander leaves - 1/2 teaspoon, chopped
Mint leaves - 1/2 teaspoon, chopped

For Grilled Cheese Sandwich:

Brown bread - 2 slices
Cheese slices - 2
Pepper powder - a pinch

Tomato Soup with Grilled Cheese Sandwich


Preparation:

For Spiced Tomato Soup:

1. Heat butter in a pan and add crushed garlic. Saute it for a while.
2. Add the tomato puree along with vegetable stock. Stir in pepper powder; allow it to boil and simmer.
3. Stir in milk and simmer for another couple of minutes. Add mint leaves and remove from heat.
4. Transfer to a serving bowl or cup and garnish with coriander leaves.

For Grilled Cheese Sandwich:

5. On a slice of bread, keep a cheese slice, sprinkle pepper powder over it and keep the other slice followed by the bread.
6. Grill on high for 10 minutes or until cheese melts.

Monday 11 March 2013

Easy Grilled Prawns with Oriental Beans Stir Fry

A few marinated prawns, and a bunch of tooth picks and you are good to go for some real good grilled seafood! Fresh prawns are really hard to resist, although looking for new marinades and ways to cook are definitely tough to do. It's been 3 days since I have been planning to grill prawns and finally the dish is ready! 

Grilled Praws with Oriental Bean Stir Fry


I marinated the shrimps in the morning hoping to have them ready for lunch, but today was one busy day at work that left me no time to cook anything substantial for lunch! So, I logged out at 6 PM today and I had the Grilled Prawns and Oriental Beans Stir Fry ready by 6.10 PM! Well, that was fast and even I was surprised! 

Oriental Beans Stir Fry


In my recipe for Oriental Beans Stir Fry, I mentioned that I am always in the lookout for perfecting this dish to find the missing ingredient. And this time, I got it! It's fish sauce ladies :-) So to the recipe here, you may add a teaspoon or so of fish sauce and you have the Singapore food court style beans stir fry ready! 

Ingredients:

Prawns - 8-10, medium, deveined and cleaned

For the Marinade:
Turmeric - a pinch
Salt to taste
Garlic - 5-6 cloves, crushed
Pepper powder - 1 teaspoon
Dried chili flakes - 1 teaspoon
Chili vinegar - 1 teaspoon (you may even use lime juice)
Olive oil - 1 tablespoon

Preparation:

1. Rub the prawns with the ingredients for the marinade and refrigerate for at least 4-6 hrs. 
2. Use toothpicks as skewers for prawns, and grill on high for 8-10 minutes or until done.
3. Serve with rice and your favorite vegetable side.


Saturday 9 March 2013

Quick Chinese Vegetable Fried Rice

So, Pradeep is away for his work and this time he wouldn't return before May. He has been around at a stretch for the past 2-3 weeks and yes, (I do not believe I am saying this) I got used to him being around and now I do miss him a lot. So for a few days now, there will not be any elaborate cooking experiments, but at least to kill the boredom especially on weekends, you will see more of simple and easy dishes.

Chinese Vegetable Fried Rice

Both I and Pradeep are selective when it comes to Chinese food, even after having spent 2 long years in Singapore! Fried rice is something I enjoy. Quite recently one of my friends introduced me to this wonderful accompaniment to fried rice that is "plain chili vinegar". Believe me or not, it sort of enhances the taste and makes the rice go easy on stomach, making you feel light. 


Quick Chinese Fried Rice


So today it is just me at the dining table :-( I decided to cook a very quick version of the Chinese Fried Rice and it got quicker with my maid doing all the veggie chopping part! 


Ingredients:

Basmati rice - 1/2 cup, cooked
Onion - 1 small, chopped finely
Garlic - 5-6 cloves, crushed
Carrots - 2 medium, chopped finely
Violet cabbage - 1/4 of a medium cabbage, shredded
Capsicum - 1 medium, chopped finely
Pepper powder - 2 teaspoon
Soya sauce - 1 tablespoon
Chili vinegar - 2-3 tablespoon (more for serving)
Salt to taste
Olive oil - 3 tablespoon

Preparation:

1. Heat up oil in a pan and put onions and garlic. Stir fry for a couple of minutes. 
2. Add carrots and cabbage, stir fry until the vegetables are tender and raw smell leaves.
3. Add the capsicum and stir fry for a couple of seconds. You do not want it to be too tender.
4. Add soya sauce, followed by 1/2 the pepper powder, 1 tablespoon chili vinegar and salt to taste. Stir well to combine.
5. Add cooked rice, mix well using 2 spoons / forks. Finish off with the other 1/2 of pepper powder and the leftover chili vinegar. Adjust salt as needed.
6. Transfer to a serving plate or bowl and enjoy with a couple of spoons of chili vinegar over it! 


Thursday 7 March 2013

Woman's Day Healthy Recipe Contest Entry for iFood.tv

Advance happy Woman's Day wishes everyone! So how have you planned to celebrate your day tomorrow? For me, a day that would have passed away just as any other has been transformed into something eventful with the Woman's Day Healthy Recipe Contest - Let's All Eat Healthy this Woman's Day arranged by www.ifood.tv ! 

Wholewheat Pizza


So here goes my entry for the contest High Fiber Pizza Crust with Healthy Mince Meat Pizza Topping.


100% Healthy Pizza


That's another great thing about working for a food website and being in charge of the team bonding and morale boosting side. Yup, I have designed the rules of the game and I get to participate too!

Wednesday 6 March 2013

Shepherd's Pie - The Ultimate Comfort Food!

This is my second attempt of this classic comfort food and I nailed it! My slightly vague understanding of this dish became more real once I tasted this at the Christmas buffet we went to. In the week that followed I tried it once, it came out tasty but not as good as I expected. Since I had all the ingredients for giving it another try, last week I made this wonderfully filling and tasty dish and we both just loved it! 


Mutton Mince Shepherd's Pie

This dish is high in calorie and hence lesser the portion the better it is. In fact just a 3 inch square piece will be enough and hence that way, I will not call it unhealthy! As long as you know where to draw the limit (let me tell you it is hard, we both ended up having 2 portions each), all is well!

So here is my version of the famous dish - Shepherd's Pie with Mutton Mince, Carrots and Violet Cabbage Filling & Mashed Potato Shredded Cheese Topping. Ooh! That is such a lengthy name, but believe me, it doesn't take that long to cook.


Easy Shepherd's Pie with Minced Mutton Filling


Ingredients:

For the Minced Mutton Filling:
Mutton mince - 500 gram
Violet cabbage - 1/4th of a medium cabbage, chopped finely
Carrots - 1 medium, chopped
Onion - 1 medium, chopped
Garlic - 6-8 cloves, chopped
Pepper powder - 1/2 tablespoon
Italian herb mix - 1/2 teaspoon
Chicken stock - 25 ml (you may even use vegetable stock for plain water)
Salt - to taste (if using chicken stock you may need less or no salt)
Olive oil - 4 tablespoon + 2 tablespoon 

For the Mashed Potato Topping:
Potatoes - 3 large, boiled and ready to mash
Milk - 4 tablespoon
Salted butter - 15 gram
Cheddar Cheese - 1/4 cup, grated

Preparation:

1. Heat 2 tablespoon olive oil in a pan and add onions, carrots and cabbage along with half the chopped garlic. Stir fry until the vegetables are tender. Remove and keep aside.
2. In the same pan, pour 4 tablespoon of olive oil and cook the minced meat. Let the meat cook in medium flame.
3. When half way through, add pepper powder and herb mix and cook for a min and then add in the cooked vegetables along with chicken stock. Let it be until the meat is cooked through and the whole mixture is moist but easily separated.
4. Add salt if needed. 
5. Mash the boiled potatoes with milk and softened butter. The mix should be fine enough for a spreadable consistency but not too watery.
6. Preheat over at 180 degree Celsius. Grease a deep baking dish and transfer the minced meat and vegetable mix into that. Spread a thick layer of mashed potato over it. Sprinkle with cheese and pop it in the oven and bake for 10-15 min.
7. Carefully slice out a portion and enjoy the best comfort food ever! 


Wednesday 20 February 2013

Dark Chocolate Cake with Cream Cheese Icing & Decorated with Fondant (Pradeep's Birthday Cake)

Even when you have had enough of each other, as a couple, there are certain things you wish to celebrate together - your wedding anniversary, birthdays and so on. Yesterday was Pradeep's birthday and after 4 years of our married life, this was the first time we were together to celebrate his birthday! Sounds weird  but, yes, duty first! Since this birthday was special, I baked a simple cake for him. To say the least, the result totally exceeded my expectations and the birthday boy enjoyed every bite of it!


Dark Chocolate Birthday Cake

First I thought to make a simple vanilla cake with chocolate icing. Then I felt that is way too simple and I wanted to try a fondant decoration, which apparently was my first try! Although I could drape it well, we both found it too sweet for our palate. Now coming to the cake, I suddenly remembered the dark chocolate bar I bought in my last shopping and chucked the vanilla idea. So dark chocolate cake it was; adorned with cream cheese icing and fondant decoration. Simple yet good enough for a first fondant trial!


Dark Chocolate Cake with Cream Cheese Icing

Making the cake and the icing was pretty simple - barely takes about 30 minutes for the preparation and another 40-45 minutes for making. And this one again is a keeper; just as moist and fluffy it should be! Recipe is adapted from here.


Ingredients:

For the Cake
Dark chocolate - 100 gram
Salted butter - 125 gram
Water - 155 ml
Instant coffee powder - 1/2 teaspoon
Cocoa powder - 1 1/2 tablespoon
Relish sugar - 6 tablespoon
Vanilla essence - 1/2 teaspoon
Egg - 1 medium
Flour - 125 gram
Baking powder - 1/2 teaspoon
Baking soda - 1/2 teaspoon

For the Icing
Cream cheese - 8 tablespoon, softened
Salter butter - 50 gram, softened
Vanilla extract - 1/4 teaspoon
Relish sugar - 12 tablespoon

For the Fondant
Plain fondant - 1 cup
Chocolate colour - 1 teaspoon
Red colour - 1/2 teaspoon

Dark Chocolate Cake with Fondant Decoration


Preparation:

For the Cake
1. In a sauce pan, melt together first 6 ingredients in low heat and stirring to ensure lumps are gone. Switch off when chocolate and butter are melted. Transfer to a bowl and let it cool.
2. Sift together flour, baking powder and baking soda.
3. Once cool enough, add the egg to the chocolate mixture and beat using electric mixer in medium speed. 
4. Add the vanilla essence, followed by flour mix portion by portion, making sure to beat after every addition to combine well.
5. Preheat oven at 160 degree Celsius. Line a square baking pan with butter paper.
6. Transfer the batter into the baking pan and bake in over for 40-45 minutes. Once done let it cool.

For the Icing
7. In a mixing bowl, cream together cheese and butter until pale. To this add the vanilla essence and sugar. Beat together until well combined.
8. Refrigerate the icing mixture for a few hours until it takes a spreadable consistency. Spread thick layer of icing over the cake. Refrigerate again to set.

For the Fondant
9. Knead together fondant dough (saving a small ball) along with chocolate coloring nicely into a roll-able consistency and until the color spreads evenly. 
10. Using a rolling pin, roll out the dough evenly into 1/4 inch sheet spreading about double the diameter of the cake. 
11. Once the icing is set remove the cake from refrigerator. Rather than lifting the fondant sheet using hand, drape it on the rolling pin and carefully transfer to the top of the cake.
12. Drape the fondant to fit the cake. Using a smoothing sheet, rub the top, edges and define the corners. Cut of excess dough from the edges.
13. Add red coloring to the small ball size fondant dough you saved and knead that too into a shape-able consistency. Shape it into a bow or whatever shape you would want to and fix it on top of the fondant you just applied.
14. Refrigerate the cake for a few hours for the fondant to set or until ready to cut! 

Enjoy! :-)